Weekly Progress
Week 1:
Multiple ideas were brainstormed when our group got together including affordable hearing aids, a controlled dosage device to help patients take their medications, a filter to convert waste into drinkable water for third world countries, and adjustable shoes that grow with children as they age. The two main ideas that prevailed were a pulse oximeter and a sleep apnea diagnosing device.
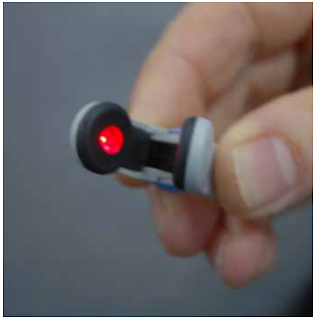
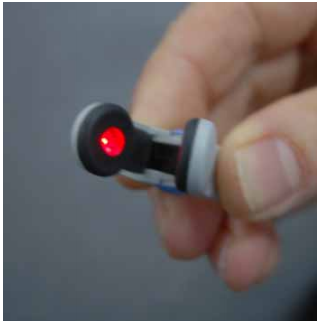
These main ideas were combined to make a cheaper alternative for diagnosing people with sleep apnea. By creating our own pulse oximeter with a clothespin, we can detect a user's heart rate and blood oxygen level. When a person is suffering from sleep apnea they stop breathing for stretches of time while they're sleeping. This causes their heart rates to spike and blood oxygen levels to drop and increases the risk for sudden cardiac arrest. By creating this cheap pulse oximeter we could help a person see if their heart rate and blood oxygen levels follow the trends of someone with sleep apnea. This is a less costly way to detect sleep apnea and gets rid of the need for a person to have access to a specialist in order to get a diagnosis.
Pulse Oximeter

https://www.gearbest.com/monitoring-testing/pp_415641.html
Clothespin Oximeter Alternative

https://www.swharden.com/wp/2012-12-06-single-wavelength-pulse-oximeter/
Sleep apnea symptoms: http://www.sleep-apnea-guide.com/sleep-apnea-oxygen-level.html
Week 2:
The group discussed the viability of a pulse oximeter that could be attached to the earlobe. Both pros (thinner skin for easier detection) and cons (more wiring for the device, possible conflict with the earbuds for the alarm) were mentioned and further research was conducted. We decided to keep the earlobe oximeter idea open as we further develop the prototype and research more topics related to photoplethysmography. We also collected materials for the device including the Arduino Uno R3, capacitors and breadboard. We talked with Dr. Wheatley and she guided us toward meeting with Frank Kepics, the Electronic Technical Senior Specialist in the School of Biomedical Engineering, Science and Health Systems. Mr. Kepics met with members of our group and gave us a great amount of advice about creating a pulse oximeter and recommended that we create a plethysmograph because it would be easier to craft. The plethysmograph would also be more effective in detecting the symptoms of sleep apnea because it can measure heart beat which can be transformed into a respiration graph to detect sleep apnea effects. He gave us a step by step introduction on how to create the circuit for the device and offered to meet with us again in the future.
Earlobe Pulse Oximeter

https://www.amperordirect.com/pc/help-pulse-oximeter/z-what-is-oximeter-plethysmograph.html


Pulse Sensor Amped


Earlobe Pulse Oximeter

http://www.who.int/patientsafety/safesurgery/pulse_oximetry/who_ps_pulse_oxymetry_tutorial2_advanced_en.pdf
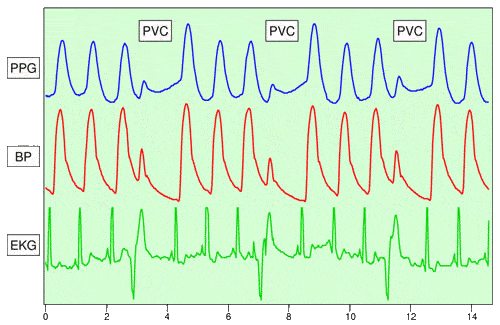
Readings from a Plethysmograph
https://www.amperordirect.com/pc/help-pulse-oximeter/z-what-is-oximeter-plethysmograph.html
Week 3:
The group conducted intensive research into photoplethysmography and how to filter noise that we may receive when a user moves. To filter the noise we learned we cold use a low-pass filter or band-pass filter to achieve accurate results. When we discussed the topic with Frank Kepics, he informed us that we can also do digital filtering directly through the Arduino's software. More testing and research will have to be done before a decision can be made on which filter will be most ideal. The group also looked into graphing the readings we would receive from the plethysmograph, essentially the breathing rate, and found several different sources with different algorithms that may achieve the desired result. Once the device is fully constructed testing will have to be done to see which algorithm works the best for this project. The group also discussed several topics with Mr. Kepics including optimal light sources for the photoresistor, the feasibility of our chosen battery, and how to control the intensity of our light source. It was agreed upon that an LED light would be the ideal light source for our device and we learned how to control its intensity by changing the amount of power that runs through it in a given time interval. Mr. Kepics also helped us determine that we will likely need either a bigger battery for our device, or two 1200mAh batteries which is our current choice. This was decided upon because the power the Arduino and its attachments will draw will require more power than initially thought. In addition to this, Mr. Kepics showed us a premade incandescent and LED photoplethysmograph and demonstrated how each worked and what each component was used for in the devices. The group learned a major deal this week thanks to our research and our second meeting with Mr. Kepics in the School of Biomedical Engineering, Science and Health Systems.
Different filtering techniques

https://www.norwegiancreations.com/2016/03/arduino-tutorial-simple-high-pass-band-pass-and-band-stop-filtering/
LED lights for an Arduino

https://pragprog.com/magazines/2010-07/meet-the-arduino
Different filtering techniques
https://www.norwegiancreations.com/2016/03/arduino-tutorial-simple-high-pass-band-pass-and-band-stop-filtering/
LED lights for an Arduino
https://pragprog.com/magazines/2010-07/meet-the-arduino
Week 4:
This week the group conducted research into low-pass filter code for the Arduino to help it better display a heart beat on the LCD screen. Open-source coding was found on the Arduino website: https://playground.arduino.cc/Code/Filters. In addition to containing instructions on how to implement the libraries containing the filters, a statistics library is also included that enables the program to keep track of the average of a value over a specified period of time. This is beneficial to the project because the device will need to track the average breaths per minute of the user.
The group also met with Mr. Kepics on Thursday, May 27, to discuss the viability of an LED plethysmograph and learn more about how LED diodes function. Mr. Kepics tried to construct an example plethysmograph out of the LED's he provided to us, specifically the OPB706C, but was unable to get a strong signal without an amplifier. The group also weighed options on whether constructing our own plethysmograph from scratch is practical given the time constraints of the project. The option of getting a cheap pulse oximeter instead and then working on the remaining tasks was brought up. This would give our group more time to work on finding the right signal, displaying it to the user, and alerting the user if he/she is at risk. Creating our own plethysmograph may take up too much time which would make the quality of the rest of our project suffer.
Some of the upcoming tasks for the project include finding an ideal amplifier and LED screen for the Arduino device and discussing more of our project details with Mr. Kepics from the School of Biomedical Engineering, Science and Health Systems.
Possible Heartbeat Display on Arduino

https://www.youtube.com/watch?v=v3PhTzJb_ak
General Operational Amplifier for Arduino

https://www.lelong.com.my/ua741-lm741-operational-amplifiers-ic-chip-op-amp-opamp-arduino-pic-nadieleczone-196095105-2018-09-Sale-P.htm
LED Diode Model No. OPB706C

http://www.ttelectronics.com/sites/default/files/download-files/OPB706-707.pdf
Week 5:
This week the group discussed the positives and negatives of pursuing heart rate versus respiration rate. We have been able to successfully monitor a user's heart rate, but filtering out a respiration rate from the plethysmograph would require a great deal of effort to produce. One way to obtain the respiration rate would be to use a nasal thermistor which measures the temperature change when a person inhales and exhales to produce a respiration rate reading. The challenges we face in using this device include obtaining a thermistor that is sensitive and able to quickly detect the temperature change in a person's breathing.
In our first meeting with Mr. Kepics this week, he was able to detect a pulse with his plethysmograph setup, but detecting a respiration rate proved difficult. Mr. Kepics told us that we could hook up his device to another machine to filter for respiration rate but we decided it might not be worth the extra effort given the time constraints of the project. During our second meeting with Mr. Kepics on Friday we further discussed the viability of obtaining a respiration rate through the plethysmograph. Mr. Kepics recommended that a cheap alternative to obtaining respiration rate was to use a nasal thermistor which as long as it is sensitive enough to detect the temperature change of a person's breathing would be a suitable option. The group will have to conduct more research to further understand thermistors and how to utilize one for our device.
Over the weekend, the group started working on building the Arduino device and using a pulse sensor amped we were able to get a reliable pulse reading using open source code from pulsesensor.com . The pulse sensor plotted the user's pulse and additionally we were able to connect an LED light to the Arduino which blinked in sync with the user's heart beat. The group will continue working on the device to get the nasal thermistor working and displaying the user's heart beat on an LCD screen.
Themistor
https://www.sparkfun.com/products/250
Pulse Sensor Amped
https://www.adafruit.com/product/1093
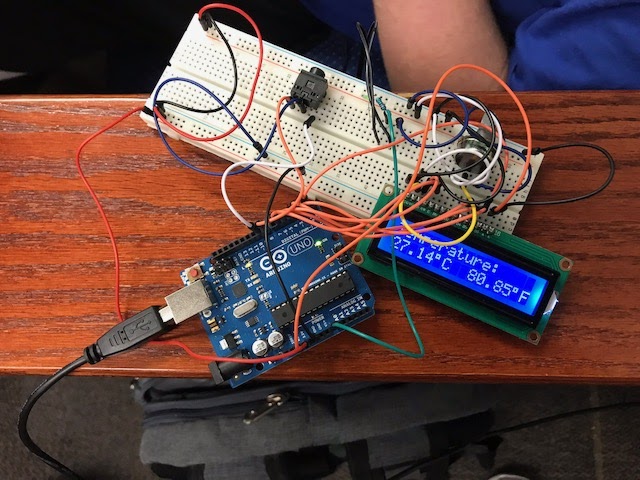
Current Arduino Setup

Current Arduino Setup

Week 6:
This week the group decided to pivot to using a nasal thermistor to detect indicators of sleep apnea. We decided that using the heart rate sensor was not going to be as reliable as measuring a user's respiration rate. The nasal thermistor we have is a PTC sensor so the temperature is measured in reverse. To correct this problem we need to obtain an NTC sensor to get an accurate temperature change measurement so we can alert a user if his/her breathing has stopped. Accompanying this NTC thermistor we also need a 10,000 Ohm resistor. Fortunately we were able to find an NTC thermistor online for a reasonable price.
The group also tested the headphone jack that we got from the Electrical and Computer Engineering parts window and we were able to output an alarm through analog headphones. The alarm was very loud so it would certainly wake up the user if he/she had stopped breathing. The group also conducted more research into how to code the algorithms necessary to get a temperature reading from the thermistor to display on the LCD screen. We were able to get this reading to display as well as coding an algorithm for displaying a user's heart rate from the heart beat monitor.
The group also started designing the case to hold the device on Autodesk. This case will protect the device and prevent any wires from getting pulled out while the user sleeps. The final case design is finalized and will soon be 3D printed at the Innovation Studio. The LCD screen was soldered onto the Arduino and is now fitted into the final design of the device and there is a spot open in the case for the LCD screen to show.
NTC Thermistor

https://www.adafruit.com/product/372
Case Design

Headphone Jack
https://www.sgbotic.com/index.php?dispatch=products.view&product_id=2432
Week 7
This week the group obtained a 10K Negative Temperature Coefficient [NTC] thermistor and testing was performed with it. The group conducted further research into algorithms useful for collecting the data needed for the device to function appropriately if a user stops breathing. The most prevalent information came from instructables.com which contained information about ntc thermistors and the equations needed to interpret the data (http://www.instructables.com/id/NTC-Temperature-Sensor-With-Arduino/). Using an algorithm designed specifically for NTC thermistors on Arduino C, a temperature reading was able to be displayed on the LCD screen in both Fahrenheit and Celsius. The device reacted quickly to changes in temperature and should be ideal for sensing the change in temperature associated with a person's breathing. Further work and research will have to be done to find the correct temperature at which the device should alert the user that his/her breathing has stopped.
The group also began the 3D printing process of the case for the Arduino device, however complications were encountered with printing it to completion. Only parts of the case were printed so using a larger 3D printer another case will be printed to completion. The parts of the case that did print out, however, proved to work with the design of the Arduino by having the correct locations and distances between ports on the device. The final case should wortk well with the device based on these observations and the sliding lid design on the bottom of the case should allow for easy insertion of the device.
Current Device Design

First 3D Print of Case

Final Case Design

Current Device Design
First 3D Print of Case

Week 8
This week the group continued researching algorithms in order to find the best way to measure a user's respiration rate. There are several open source codes that must be tested in order to find out which is most ideal. Ideally, the respiration rate must be read and displayed in real time and alert the user if his/her breathing has stopped for an extended period of time. A respiration rate below 12 breaths per minute is considered to be a dangerous level so an alarm would go off if the respiration rate falls below this level (https://my.clevelandclinic.org/health/articles/10881-vital-signs).
The group is continuing to have problems 3D printing the case for the device as the people in the Innovation Studio continue to resist and delay the printing of our case. We have tried multiple times to use the 3D printers in the Innovation Studio only to be told days later through an email that the case was not printed and that the dimensions are not correct. The case dimensions have been checked and re-checked but now the workers at the Innovation Studio are insisting on laser cutting a case out of balsa wood, which may not be the ideal material for a case that has to be worn on a person's arm for extended periods of time. The case may also not be strong enough to hold the weight of a person who may roll onto the device in his/her sleep. The case is the last piece needed for the physical design of the device.
Things to do going forward in this project will be to re-evaluate the design constraints of the device, consider how to sanitize the nasal thermistor, and how to use the device on a large scale such as in a hospital.
Expected Appearance of Balsa Wood Case

Week 9
This week the group was finally able to get the Arduino case 3D printed out of balsa wood using a laser cutter. The case will have to be sanded down to correct for slight dimension errors but the device fits nicely inside the case. The sliding case design was not able to be implemented, so Velcro strips will be used instead to secure the case which may actually be more user friendly. The case was printed in parts which were put together using a hot glue gun with wood glue. The case seems very secure and some testing will have to be done on its structural integrity.
The final code was also further developed this week to display breaths per minute on the LCD screen. The final part of the code that must be implemented is the respiration rate at which the device decides to wake up the user. Testing will be done with the thermistor to determine whether a drop to a certain temperature or a percent drop in temperature will be most effective.
Research was conducted by the group this week to determine how to sanitize the nasal thermistor. Alcohol seems to be effective at cleaning epoxy resin so the most practical way to clean the device would be to use alcohol wipes on the thermistor.
Final Case Design

Comments
Post a Comment